How to Wire a 3-Way Lamp Socket | A Complete Guide to Follow
You may operate a lighting fixture (or other electric installation) from two different locations with a 3-way switch. Common examples are putting 3-way switches adjacent to doors in a room with two access points or putting 3-way switches at the top and bottom of stairs.

Knowing how to wire a 3-way lamp socket is easy if you have a little knowledge of wiring and electrical diagrams. In this article, we will help you with that! So let’s get into 3-way lamp sockets and how to install them.
Installing a 3-Way Switch on a Lamp
When used with light bulbs that have been carefully manufactured, a three-way lamp’s four-position rotary switch may flip between illuminating the bulb at comparatively dim, moderate, and brilliant levels—as well as, of course, off. Any reasonably skilled homeowner may replace the three-way switch when your three-way light isn’t functioning, and you’ve ruled out issues with the bulb, outlet, wire, and plug.
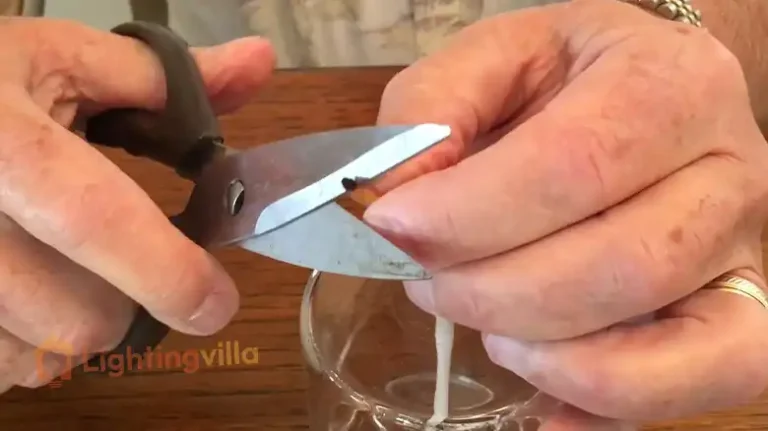
- The lamp’s power wire should be unplugged from the socket. Disconnect the lamp’s shade, shade fastening rod, and light bulb.
- To carefully release the lamp socket from the base, insert a tiny flat-head screwdriver between the socket’s bottom and the platform. Lift the plug as far as the internal wire will allow from the bottom. To see the wire connections beneath, slide the metal container away from the base.
- Separate the two wires by unscrewing the two wire connectors.
- Remove the old assembly by twisting the switch base away from the threaded rod.
- Onto the rod, insert the new three-way switch unit. To finish the connection, attach the two colored wires to the corresponding color-coded contacts and fasten the screws. The cardboard cover should cover the wire as you press the connection into the base until it latches into place.
- YOu should use a three-way bulb with the required wattage in its place. Then swap out the lampshade and shade-mounting rod.
- Test the lamp by connecting the electrical cable to the outlet.
How to Wire a 3-Way Lamp Socket – Wiring the Lamp Socket
The finest lighting is the sort you can control—make brighter or dimmer, not just turn on or off. But the truth is that you only need to swap out the socket to convert almost any light into a three-way bulb. It’s easy. Let us demonstrate.
To begin, unplug the lamp, detach the lightbulb, and remove the bracket or harp that supports the lampshade. Look for the phrase “push” on the side of the socket to remove it. Use your thumbs to press on that, and it will pop off. You should remove the wiring from the old socket by loosening the terminal screws. After that, connect the wires to the socket’s terminal. The socket covering, bracket, bulb, and shade should all be replaced before the final steps.
If you plug the bulb back in, you may now have lights for almost any mood or situation.
You only need to swap out the present lamp sockets (with its constructed switch) for a new one that has a three-position toggle and will accommodate a three-way bulb if the lamp has the basic brass connector common in floors and tabletop lamps for several years. These may be placed in the place of the current socket and were the same size as typical light sockets.
What Are the Causes of Light Bulbs Blowing Out?
To rule out more major electrical wiring issues, there are a few causes of quickly burning lights that you should look for. You may have frequent light bulb failure for the following reasons:
Strong Wattage
In addition to damaging the light bulb, using a greater wattage bulb than what is advised for a particular light fixture poses a major fire risk.
The Motion of a Light Bulb
The excessive movement of a light bulb, such as that seen in a roof fan installation or a garage light, can harm the filaments and reduce the bulb’s lifespan.
Problems with the Lighting
Did you notice that over-tightening the screw on a bulb might result in a bad connection? You can warp the metal connecting tab at the bottom of the fixture’s sockets by using too much pressure when installing a light bulb. Over time, this loose attachment will cause the light bulb to strobe. The light bulb will eventually burn out more quickly due to this.
Too Much Voltage
The voltage in your household is too high, which is the most serious reason the bulbs constantly go out. Your home’s voltage may be too strong for the wiring to manage if you discover several light bulbs in various rooms are going out regularly or around the same time. A qualified electrician must address this issue right away.
Frequently Asked Questions
Does it matter which wire goes where on a lamp?
It matters. The longer blade of the plug, known as the grounded wire or neutral, has a wire that attaches to the silver nut. You may either trace the wire up from the plug or look for a few little bumps on the wire that is connected to the bigger blade.
What is a 3-terminal lamp socket?
A three-terminal connector enables the wiring of two sockets so they may operate on the same switching. One connection must be keyed, and both connectors must be three terminals. Three illumination settings are available when the key is turned: Off, Both On, and Keyed On with Automatic Off.
Conclusion
Simple wiring is shown in the design of a typical 3-way light switch. When the switch knob is twisted, a three-way bulb with two independent components that are activated independently and then jointly to produce changing intensities of light is utilized with the socket. One connector is for the live wire, and the other is for the neutral in these connections. Although it could exist, this circuit does not use the third connector.
Recall that you push where it reads “Click” on the top of the brass enclosure to remove the old bulb socket. The upper portion of the shell will pop off its support if you squeeze firmly while leaning it to one side. This shell has an insulation liner inside; you should be able to take it out individually, but it should come off with the shell.
Its bottom and the wires’ connections are visible when removed. Remove the bottom and disconnect the cables. Now disassemble the replacement socket using the same order of components: base, insulating liner, and brass shell. Just like that!