How To Remove The H11 Bulb | Shown Step By Step
Although taking an H11 bulb from its socket may seem scary, it is now feasible to do it fast and easily by following a few simple steps. Being independent is generally a good thing and changing an automobile headlight is no different.
In this blog post, we’ll show you how to swap out the h11 bulb in case it burns out. Even though this process is quite straightforward, it’s always a great idea to be prepared for almost anything. Let’s move on!
How To Remove The H11 Bulb: Taking an H11 Bulb Out of the Socket
You might occasionally need to remove an h11 bulb from its socket. One reason is if the bulb has to be changed after it burns out. Other arguments include changing the headlight totally or cleaning the connector. Whichever the reason, as it is such a straightforward process, anyone can simply take an h11 bulb from its socket.
What You Will Need
It merely takes a few tools to remove an h11 bulb from its socket. These are
- A flat-headed Allen key
- If you’re replacing the existing one, a brand-new H11 light bulb.
- Optional, but it’s a good idea to protect your hands by wearing gloves.
- A Pal (optional but useful)
Step 1: Disconnect The Light Switch
Make certain the switch is off before starting this method. This will reduce the possibility of any electrical accidents happening while you work. Remove the switch’s cover with a screwdriver. You may then see the cabling you need to unplug. The light is not on.
Step 2: Find The Lightbulb Holder
To remove the H11 headlight bulb, you should locate the lightbulb socket. A plastic piece that is either silvery or black, houses the lightbulb. There could be a little lever or button just on side of the holder that must be depressed for it.
Step 3: Find the Bulb Sockets
Once you’ve found the headlight components, you need to find the bulb connections. The lightbulb sockets are often simple to recognize thanks to their glass or rubber dust covers. If you can’t find the bulb sockets, look in your car’s owner’s manual for guidance.
Step 4: Disconnect the Electrical Connection
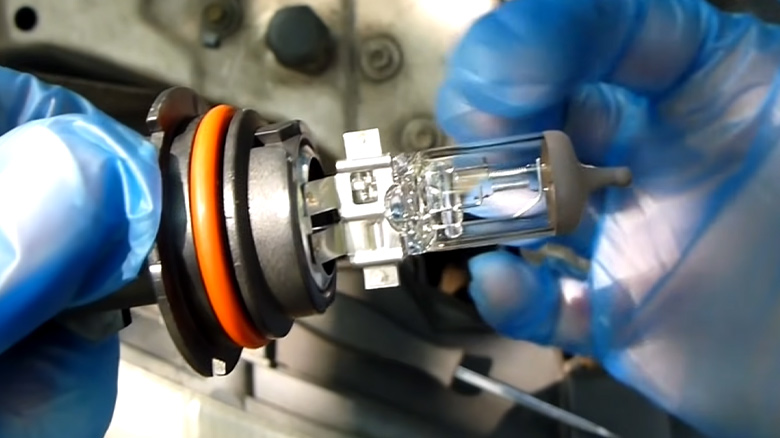
Before removing the lightbulb, you must remove the wiring. Next, locate the little tab just on the connector’s back and press it. Simply holding the tab, totally detaches the connector from the lightbulb. If you make direct touch with the glass portion of the bulb using bare fingers, it might fail sooner than expected. Remove the light right away.
Step 5: Remove the bulb from the socket by unscrewing it
Once you’ve identified the H11 bulb, it is indeed time to remove it from the socket. To do this, unscrew the lightbulb from the socket using a set of pliers or your bare hands. Unscrew the bulb, remove it from its socket, and dispose of it properly.
Step 6: Shake Out Any Extra Dirt Or Dust In Step Six.
After it has been taken out, you may inspect the bulb for damage. If it’s damaged or affected in any other way, you’ll need to purchase a new one. You might try blowing off any additional dust or dirt before reconnecting it if everything seems to be intact and clean. The optimum lighting performance is ensured by doing this.
Step 7: Place a Fresh Bulb Into the Outlet
Buy a brand-new H11 bulb. These are accessible online or at your local auto parts store. Properly insert the brand-new light bulb to make sure it is placed in the socket correctly. If you’re having difficulty getting the substitute bulb to fit properly, check the power cables on the lightbulb. With a clean cloth, remove any dirt and debris. The new bulb then needs to be twisted into place to keep it there. Put the replacement bulb in carefully.
Step 8: Tighten The Light Bulb’s Connection To The Socket.
Before attempting to remove an H11 bulb from its socket, make certain that the power to the socket has been turned off. Finally, take the screws out of the sockets that hold the light bulbs. Remove the lightbulb from the socket lastly.
Step 9: Activate The Switch To Check Things Out
So now your replacement H11 bulb has been fitted, it’s time to make that everything is working by switching on the light switch. Make sure the connections are safe if the lights won’t turn on. Check the connection as well to make sure the lightbulb is positioned properly. After checking sure everything functions, replace the lens cover and enjoy the product H11 light bulb!
Now that you know how to remove an H11 bulb from its socket, it’s time to get started.
Removing Corrosion from Car Sockets
If your car’s sockets are rusty, you should clean them before replacing the bulbs. The simplest way to do this is to use a scrub brush or other similar systems to remove any corrosion. You also might need to employ a little sanding to erase any stubborn rust. You may change the bulbs after wiping the sockets.
If your car’s sockets have severe rust, you may be required to fix them. Even though it is a more complex procedure, you can still perform it yourself if you’re experienced with tools. New sockets must be purchased, and they must then be connected by the directions in your owner’s manual. to learn more about how to take an H11 bulb out of its socket.
Frequently Asked Question
What Fits With The H11 Led Bulb?
The H11-size lightbulb, which is offered in several vehicles, such as the 2012–2015 Tacoma from Toyota, the 2019–Ford Raptor, as well as the 2012–2016 Honda Civic Si, is the most popular type of bulb used in modern automobiles.
Can I Use LEDs In Place of H11 Bulbs?
You may replace your hefty Halogen headlights with the newest model. Modern LED technology allows for error-free and flicker-free functioning, so unnecessary concerns may easily be avoided.
What Is The Same Bulb As An H11?
The H11 bulb in the car can be replaceable with an H11B, H8, or H9 lightbulb. All of these bulbs would fit into the sockets on your car as they are all the same size and shape. But before you make the switch, see if the owner’s manual for your automobile recommends a certain bulb.
Do Headlight Bulbs Need to Change?
You might be wondering if you can replace a burned-out headlight bulb on your own. The good news is that changing a headlight bulb is typically an easy and quick process. In most cases, you should be able to finish it in less than 15 minutes.
What Is a Headlight Socket?
A headlight plug is a tiny metal cup that holds the headlight lamp within the headlight assembly. The socket’s metal prongs create an electrical connection with the lightbulb’s base, igniting the filaments within. Over time, the connector may corrode or deteriorate, which would prevent the required contact from forming and make the headlight useless.
How Can You Tell When a Headlight Is Broken?
To determine which headlight is damaged, remove the bulb from the socket. Once the bulb has been removed, look at it to see whether the filaments have any damage. If the filament is truly harmed, that headlight is no longer operational.
Conclusion
It is straightforward to do the procedure if you know how to change an H11 bulb out of its socket. This guide can also be used to help another person who might need help. Be careful to share this information with your friends and family so that they may change a light bulb safely.